
 Marcio Vasconcelos
Do you need to install tile on your floor or on your wall, and are thinking of doing it yourself? Installing a tile floor can be a rewarding DIY project and can save you some money. Laying tiles can be a pretty enjoyable task, but if you don’t think the steps through before starting the project may complicate the process. Thinking of that, we have created a step-by-step guide on how to do it:
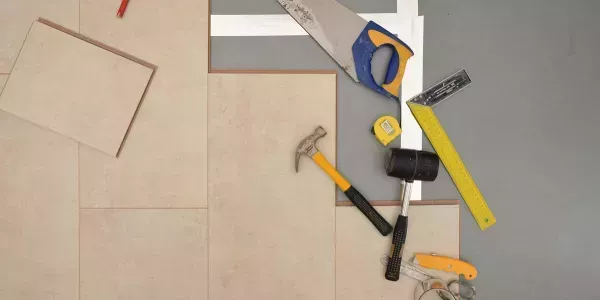
Gather Your Materials and Tools
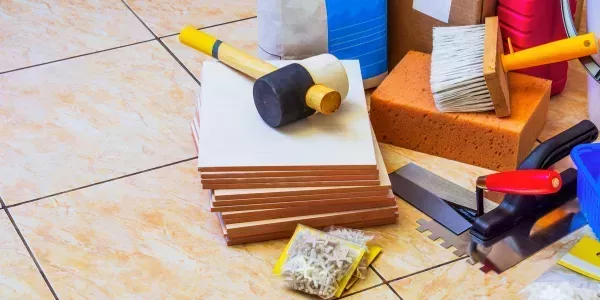
To start the job you must be sure you have everything you need. Make a checklist of the material and tools you need and gather them in your work spot. The list below contains the most common material and tools used when laying tiles:
Materials
- Tiles: Choose your preferred type (ceramic, porcelain, etc.).
- Underlayment: Cement backer board, membrane, waterproof underlayment, self-leveling, etc.
- Adhesives: Thin-set mortar, epoxy, mastic, or tile adhesive.
- Grout: Sanded or unsanded, depending on tile spacing, epoxy, etc.
- Drywall screws
- Backer board
- Fiberglass joint tape
- Caulk
Tools
- Cutting tool: wet saw, tile cutter, snap cutter, etc.
- Orbital sander
- Mixer bit
- Trowel
- Leveling spacers
- Float (for grouting)
- Utility knife
- Buckets
- Sponges
Preparing the Subfloor and installing the underlayment
The foundation of your tile installation is the key for a successful and long-lasting result. That's why before installing the tiles you will need to prepare your floor and install an underlayment. By doing that we will ensure your floor is flat enough for tiling and also provide other benefits like insulation, waterproofing and sound reduction.
Here, we will list step by step on how to prepare the subfloor and install a backer board underlayment.
- Lay a wood subfloor in the area where you will install the tiles. Attach it to the floor using nails and/or staples.
- With a straight edge, look for any uneven spot and mark it down. After that, use an orbital sander to sand down the high spots and make an even surface. Next, fill with caulk the subfloor seams.
- To make sure you have a stable base for the tiles, cement backer boards need to be installed on the subfloor first.
- Measure and cut the backer board to size, then spread the thinset on the subfloor with the help of a trowel. Spread it slightly larger than a piece of a backer board.
- Comb the thinset with the notched edge of the trowel at a 45 degree angle to the floor and ensure the lines are going the same directions.
- You need to work quickly, while the thinset is wet, to set the sheet of backer boards in place. After setting all of the panels, walk gently over them to set them into the thinset. After that, secure them with screws drilled every 6 to 8 inches.
- Add a layer of thinset over the seams, then use fiberglass mesh tape along all seams and finalize with another layer of thinset over the tape.
- Smooth out any ridges or high spots from edges across each border until everything is as smooth as possible. Allow the thinset to dry for 24 to 48 hours.
- The concrete floor needs to be free of adhesives to ensure a good bond between the floor and the tile. Sprinkle water over the concrete floor; if the water penetrates, a good bond between the concrete and tile will form. If it doesn't, then it will need to be replaced.
- Check for cracks and uneven parts. If there is a crack larger than 8 inches, patch and fill it with cement compound first. If there is an uneven part, fill it with a self-leveling compound.
Plan Your Layout

Now that you have your underlayment prepared, it is time to decide the layout of your design. This step is very important, because once you start installing tile, having to go back and rethink the layout could prove stressful.
Find the Center
Determine the center of the room by measuring the length of the room and divide by two, then measure the width of the room and also divide by two. This will tell you where the middle of the room is. Snap chalk lines from the midpoints of each wall to form a cross in the center.
You always want to start installing the tiles by the middle of the room, working with the areas farthest from the door, to finish at the door. Once you install the tile you can not step on it until it gets dry.
Dry Fit Tiles
Arrange tiles along the chalk lines to plan the layout you choose without adhesive, adjusting to avoid small cuts at the room's edges.
Installation Process
Now it's time for the fun part: installation. Here we will discuss all the essential steps, such as mixing and applying adhesive, laying tile, and some finishing touches.
Mix and Apply Adhesive
Mix Thin-set
Following the manufacturer’s instructions, mix the thin-set mortar. The consistency (consistency of mayonnaise) and timing (if it is still wet or not) of your thinset are the key to a successful installation.
Applying thinset
Starting at the center, use a notched trowel to spread an even layer of thinset to the underlayment, making sure the lines are going in the same direction.
As you did when you laid the backer board, comb the thinset with the notched edge of the trowel at a 45 degree angle to the floor. Only cover as much area as you can tile in 15-20 minutes to prevent drying. Thinset is what guarantees that your tile will be attached to the floor.
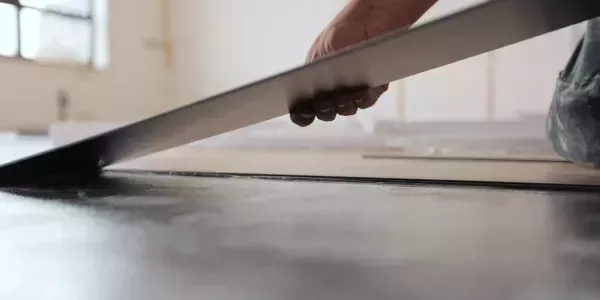
Lay the Tiles
- Place Tiles: Set tiles firmly into the thinset, twisting slightly as you press down to create a solid layer of thinset beneath the tile. Use spacers to maintain consistent gaps for grout throughout your installation.
- Keep setting your tiles according to the layout pattern you’ve decided, always adding spacers, until reaching the edge of the room.
- Cut Tiles: For edges and corners, measure and cut tiles with a tile cutter or wet saw. You can opt to lay down all the tiles and save cutting for after the floor is ready. This will allow you to work on the edges on the floor without problems. Or as you move along, already cut and install the edge tiles.
- Allow Adhesive to Set: Let the adhesive set according to the manufacturer's recommendations, typically 24 hours. Now is the time to wait and feel proud of all the work you have done.
Apply Grout
- Cleaning the area: Clean off any excess thinset with a utility knife, use a wet sponge to wipe the tiles, until they are perfectly clean.
- Mix Grout: Mix the grout as per instructions. Follow the instructions carefully, since grout beyond giving a nice line of color between your tiles, bonds your tile and prevents it from cracking and chipping. What can happen due to the home’s movement.
- Depending on the type of tile, you will need to apply a grout release or a stone sealer before grouting.
- Apply Grout: Using a rubber float, apply grout at a 45° angle to the tile and swipe the float along the tile diagonal to the tile gaps to avoid pulling grout out of the joint. Make sure you fill the joint from top to bottom, and try your best to minimize the excess grout on the tile.
- Clean Excess Grout: With a damp sponge, gently wipe away excess grout from the tile surface each 10 or 30 minutes. Be careful not to press too hard on the freshly grouted lines or use too much water and wash away the pigment in your grout.
Finishing Touches
Cure Time
Allow the grout to cure for the time specified by the product.
Sealing
Depending on the type of tile and grout, you might need to apply a sealant for extra protection. They will give a matte or shiny look to the installation while ensuring its durability for the long run.
Don’t forget to regularly clean the floor with suitable cleaners to maintain its appearance and longevity. Avoid using abrasive tools when doing tile maintenance.
Tips and Warnings
Safety First
Always wear protective gear like gloves and safety glasses when cutting tiles.
Consistency
Ensure consistent application of adhesive and grout for a professional finish.
Dry Layout
Spend time on the dry layout to avoid complications during actual installation.
Leveling
Regularly check for level during installation to avoid uneven tiles.
We hope that by following these steps, you successfully install a tile floor in any part of your home. Remember, patience and precision are key to a beautiful and long-lasting tile floor.
People also ask
What is the 3 4 5 rule for laying tile?
Also known as the Pythagorean theorem, this rule is used to get a perfectly square corner (at a perfect 90-degree angle). If you get a three-foot length on your straight line, a four-foot length on your perpendicular line, and a five-foot length across correctly, you'll have a perfect 90 degree angle.
What do I install under the tile floor?
When installing a tile floor, it's essential to have the right foundation or underlayment beneath the tiles. The underlayment provides a stable, flat surface to lay the tiles and can also provide other benefits like waterproofing, insulation, and sound reduction. You can use underlayments like cement backer board, plywood, mortar bed, etc.
What gap to leave between tiles?
The gap or grout joint you need to leave will depend on several factors: The size of tile you're using: For larger or less uniform tiles, wider grout joints (up to 1/2 inch) are recommended, while rectified, precisely cut tiles can have narrower joints (as small as 1/16 inch).


